Taco Lasagna with layers of pasta, cheddar cheese and cumin spiked meat sauce made from ground beef taco filling. It’s sure to become one of your family’s favorite easy weeknight meals!
Jump to:
Comfort meal inspired by grandma
It’s easy to serve up this hearty and deliciously cheesy meal on even the busiest weeknights when you have a stock of frozen ground beef taco filling or some leftover from the night before.
This simply delicious recipe is based on my grandma’s recipe and method. A few years ago when I visited with my kids grandma pulled a Taco Lasagna that had been vacuumed and sealed out of the freezer and popped it in the oven.
While we chatted, it cooked. And later, to my surprise, even the pickiest of my kids ate it up and asked for seconds!
Although grandma was slightly embarrassed by her frozen homemade dinner, we were all impressed by it.

And this easy lasagna recipe has been a staple in our dinner rotation ever since.
It’s especially easy to make taco lasagna when you plan ahead and pre-cook and vacuum seal up a big batch of versatile and economical ground beef taco filling.
Or you can do like grandma and vacuum seal the entire frozen lasagna using BPA-free vacuum-seal bags and the FoodSaver® System.
Content created with compensation by Collective Bias, Inc. and its advertiser. All opinions are mine alone. #SealToSavor #CollectiveBias
Ingredients
- No boil lasagna noodles – This taco lasagna recipe is made with no bake lasagna noodles but can also be made with flour or corn tortillas for another easy variation. No boil noodles are not only a great time saver, they give this lasagna a distinctive light bite and absorb the cumin spiced sauce perfectly.
- Ground beef taco meat – either made fresh or from frozen. The homemade ground beef taco filling is seasoned with a blend of spices, but feel free to use taco seasoning if you have that mix instead. For extra heartiness add canned black beans to the filling.
- Canned tomatoes – diced tomatoes and tomato sauce. Or substitute fire roasted tomatoes or Rotel for even more kick!
- Shredded cheddar cheese – or make a cheese sauce or use cream cheese instead of using shredded cheddar cheese.
- Like a little extra crunch? Sprinkle on doritos before serving.

Step by step instructions
- Simply heat taco meat with diced tomatoes and tomato sauce.
- Then layer sauce with shredded cheddar cheese and no boil lasagna noodles. Start with a small amount of sauce on the bottom then layer pasta, sauce and cheese. Alternate direction of the no bake pasta on each layer for a sturdier lasagna.
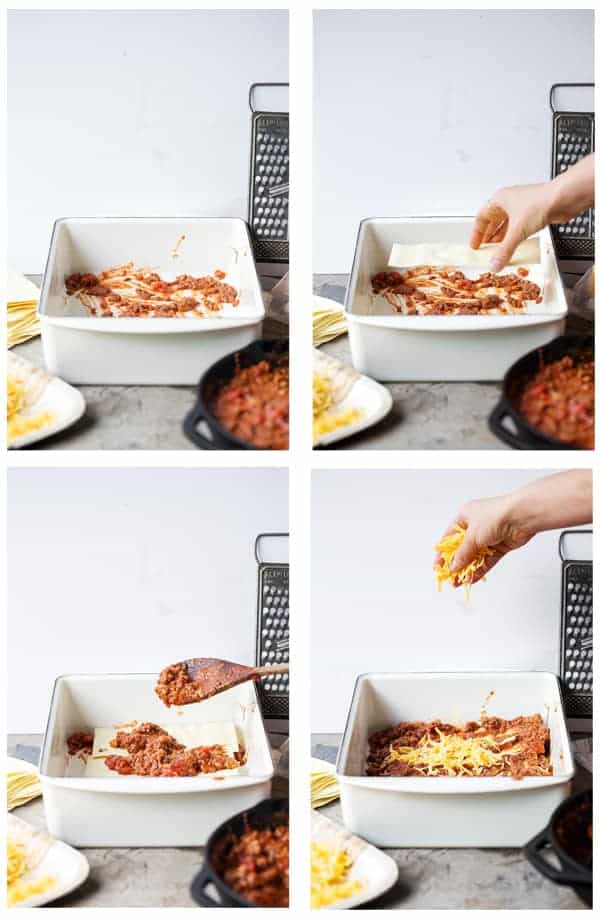
- Finish with a final generous pile of shredded cheddar cheese. To ensure that the noodles soften rather than get crispy fully push the entire mixture down to submerge in liquid. Then cover tightly with foil to steam.

- Bake covered in preheated 375 degree fahrenheit oven for 35 minutes.
- Then remove cover and continue baking until top is bubbly and browned.
- Garnish taco lasagna as desired and serve.
- Enjoy!

How to serve
When deciding what to eat with taco lasagna think of it like traditional lasagna and serve with a crisp green salad, bread or breadsticks. But think of it like tacos when garnishing taco lasagna. Sour cream, scallions, cilantro, olives and hot sauce are all great toppings for taco lasagna.

How to freeze lasagna
To freeze a whole lasagna uncooked simply build lasagna in a freezer safe pan and freeze the cooled and baked lasagna. Once frozen pop the lasagna out of the pan and slide the whole lasagna into a vacuum seal bag. Then seal and freeze for up to 3 months.
Either defrost refrigerated at least 8 hours and bake as directed. Or, bake from frozen adding an additional 30 minutes to the bake time.
Or to freeze cooked lasagna bake and cool completely. Then slice into individual servings and vacuum seal then freeze for up to 3 months. Microwave or bake from frozen or defrost before baking.
📖 Recipe

Ingredients
Taco Lasagna
- 1 pound ground beef taco filling
- 15 ounces canned tomato sauce
- 15 ounces canned diced tomatoes
- 8 ounce package no boil lasagna noodles 16 sheets
- 4 cups grated cheddar cheese
- ¼ cup water
- scallions, sour cream, cilantro optional
Ground Beef Taco Filling
- 1 pound lean ground beef
- 1 tablespoon oil
- 1 medium yellow onion minced
- 3 cloves garlic minced
- 1 teaspoon salt to taste
- 2 tablespoons chili powder
- 1 teaspoon ground cumin
- 1 teaspoon ground coriander
- 1 teaspoon dried oregano
- ¼ teaspoon cayenne optional
- 1 tablespoon tomato paste
Instructions
Taco Lasagna
- Preheat oven 375 degrees Fahrenheit. In medium saucepan add beef taco filling and warm over medium heat. Add canned tomatoes, tomato sauce and cumin. Add ¼ cup water to empty tomato sauce cans and swish around then add to saucepan. Increase heat and bring to a simmer. Simmer until thickened, about 7 minutes and season with salt to taste.
- Lightly spread ½ cup sauce on the bottom of a oven-safe 9″ x 13″ baking dish. Roughly divide remaining sauce into 4 portions. Layer 4 noodles, overlapping slightly, on top of the sauce. Top with the first ¼ of the sauce, 1 cup of grated cheese and the 2nd layer of noodles. Repeat 2nd layer of sauce, another cup of cheese, and the 3rd layer of noodles. Finish with the 3rd layer of sauce, 3rd cup of grated cheese, and final layer of noodles. Top with last of the sauce and an even layer of grated cheese.
- Seal tightly with aluminum foil and bake 35 minutes. Remove foil and bake uncovered until browned and bubbly, about 10 minutes. Let reset 15 minutes before slicing. Serve as desired with sour cream, olives, sliced scallions, cilantro and/or chopped white onion.
Ground Beef Taco Filling
- Heat oil in medium skillet over medium heat until shimmering. Add onion and cook until softened, about 5 minutes.
- Stir in garlic, spices and 1 teaspoon salt. Mix in ground beef, increase heat to medium high and break up with a spoon until browned, about 5 minutes.
- Stir in tomato paste and cook about 1 minute before adding water. Then increase heat and bring to a boil. Reduce and simmer until thickened, about 10 minutes. Serve or cool and store for later use.
Nutrition








ModernMindfulMom
5 stars! This was delicious! Love the aim on traditional lasagna!