

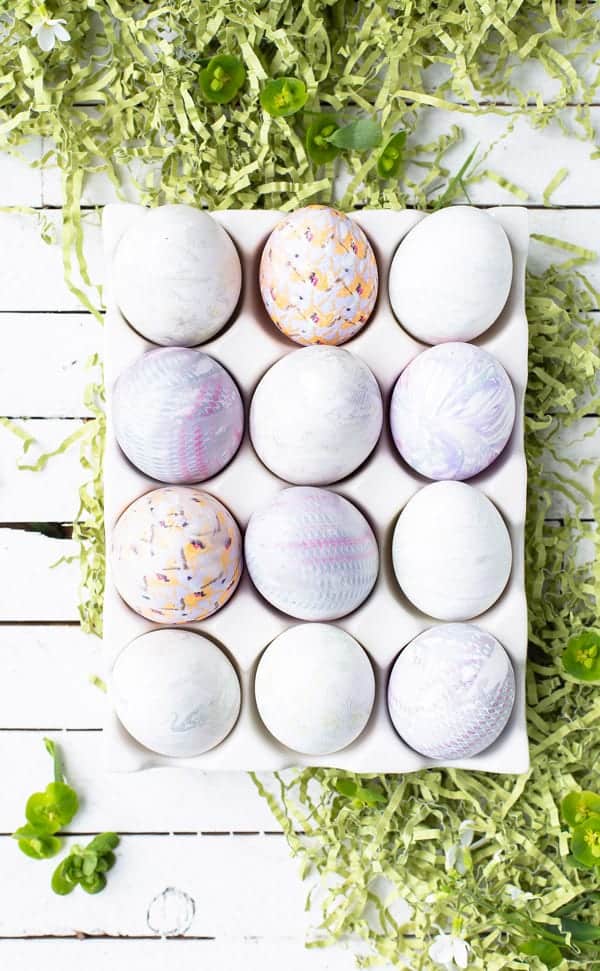
Fabric Dyed Easter Eggs are a fun method for coloring Easter eggs that easily creates stunningly intricate graphic designs.

Transferring designs from fabric to egg shells is such a fun new way to mix up Easter egg decorating!
Silk dyed Easter eggs an old, new tradition
Silk dyed Easter eggs are an old tradition that were first introduced to me in my early twenties. Featured on season one of the Martha Stewart show this decorated Easter egg method was so intriguing! Completely different than traditional vinegar dye tablets this stunning Easter egg dying technique was quickly adopted as one of our family Easter traditions.I especially love how it resembles the designs of the painstakingly created Ukrainian dyed eggs. Made with intricate beeswax designs and thoughtful dips in different dyes Ukrainian eggs are gorgeous! But these Fabric Dyed Easter Eggs achieved similar fun results in a whole lot less time.

Silk eggs are created as the dye transfers from fabric to egg shells with the help of hot water, vinegar and time. Simply choose some fabrics, old silk ties and scarves from the thrift store work great! Then wrap, boil and be amazed by the beautiful graphic designs transferred to the egg shells!

How does fabric dye egg shells?
Most silk and rayon fabrics are made from acid based inks. Which react with acidic vinegar in the boiling water to transfer their designs onto the porous egg shells.

Supplies
- Eggs – raw eggs or egg shells with the eggs blown out.
- Rayon or silk fabric– typically the brighter the fabric the more likely it is to have been printed with acid based ink and will work well for this creative Easter egg dying technique. Find fun rayon printed blouses and dresses and old silk scarves and neck ties at second-hand stores. Or simply hit up the rayon aisle of your favorite fabric store and look for an interesting print. Typically bright blue and red prints transfer best, but it’s always exciting to see how the different fabrics will perform. Which is just part of the fun! Find a fabric that transfers well? Use it over and over to dye eggs until colors no longer transfer.
- Cotton or muslim pieces – to hold the silk in place over the egg and attempt to prevent too much dye from escaping.
- String – rubber bands, or twist ties or string to hold the fabric layers over eggs.

Step by step instructions
- Wrap eggs tightly in printed fabric with bright side facing egg. Secure with a twist tie, rubberband or string.

- Wrap again in cotton to help the ink stay close to the egg.
- Place in a large pot and cover with cold water. Bring to a boil, reduce heat and gently simmer 25-35 minutes.

- Remove eggs from hot water and place on a kitchen towel to cool.
- When cool enough to handle remove fabric and reveal your creations!

Can you eat eggs dyed with silk ties?
Fabric and silk dyed eggs are edible, but they aren’t really safe to eat. Because it’s very difficult to know whether you’ve boiled your eggs in toxic or non-toxic acid based ink. If you could guarantee you are using a non-toxic fabric, then you could boil the eggs and store refrigerated to be eaten within 3 days.
How to keep dyed eggs forever?
Make fabric printed Easter eggs and use them as decoration for years! Simply poke a hole in the end and use a tool to blow out eggs before wrapping and simmering. Note – shells will be more fragile and may need to be wrapped with a few layers of cotton to prevent them from breaking.
Ingredients
- 12 large eggs
- 1 yard rayon or silk fabric
- 1 yard cotton or muslim scrap fabric
- 24 medium rubberbands or twist ties
- ¼ cup white vinegar
- 8 cups water
Instructions
- Tightly wrap each egg in a piece of rayon or silk fabric with the bright side of the fabric facing the egg and secure with a twist tie, string or rubberband. Add a piece of cotton scrap over the wrapped egg and secure with another rubberband or twist tie. Repeat with all eggs.
- Carefully place wrapped eggs in a large saucepan and cover with water. Bring to a boil, reduce hit to simmer and simmer for 25-30 minutes. Remove eggs with tongs to cool on a dish towel and when they are cool enough to handle remove fabric to reveal the pattern. Display your creations.


Leave a Reply