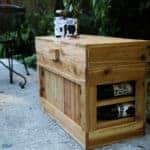
How to build a wine rack cooler seat
Step by step instructions to build a wine rack and cooler seat in one!
Servings 1 cooler seat
Cost $50
Equipment
- saw
- hammer and nails
- safety equipment
Ingredients
- 1 medium cooler any size
- 10 1x4 cedar boards
- wood glue
- 100 1 ¼" construction screws
- 1 large hinge
Instructions
- Remove cooler handle and measure dimensions.
- Add 10" to the length, and 2” to the width. Using the new dimensions create three identical frames that will be the seat top, bottom and lid.
- Attach boards cut additional board as high as the cooler and equally space them between the upper and lower frame.
- Create the lid by attaching boards to the top of the last frame.
- Attach boards across the bottom to create a base and insert cooler.
- Attach the lid to the seat using the long hinge. Add a divider on either side of the cooler and insert a board to create two shelves.
- Using a 1 ½” paddle bit, drill a hole from the front of the bench above each of the four shelves to hold the wine bottles.
- Stock with your favorite beverages.